Beef stew recipe

Standard

1-2 lbs stew beef, cubed (depends on how meaty you want it)
2-3 medium potatoes, peeled & quartered
1 large onion, chopped
1 bottle V8 juice
1 small bag of baby carrots

1. Place all of the ingredients in a slow cooker. Fill to top with V8 juice.
2. Let cook on low all day. When you get home, you’ll have a wonder hearty dinner all ready for you!

Pancake recipe

Standard

I love posting my fav recipes on my website. It makes it easy to keep track of them. Plus, I love sharing my fav finds.

I was looking through my pancake post and realized that I never gave the actual recipe I use….So here it is!

1.5 c flour
3.5 tsp Baking powder
1 tsp salt
1 tablespoon sugar
1.25 c milk
1 egg
3 tablespoon melted butter

Put a lightly oiled pan on medium high heat. Use 1/4 c. Batter per pancake. Makes 8-10 cakes. Enjoy!

(Got the recipe off http://allrecipes.com/recipe/good-old-fashioned-pancakes/)

Kirkland diapers

Standard

I love using cloth diapers. But I have been informed that the church daycare on Sunday mornings doesn’t do cloth. If kiddos come in wearing cloth and need a change, then the staff will ONLY change them into a disposable diaper. I usually like to change my kiddo moments before I put him in daycare. He’s only in there for an hour. But there are a few times when he goes poo moments after he’s gotten a diaper change. It’s bound to happen. So that means I have to have a few disposables on hand for church.

I like shopping at Costco. There boxes of diapers cost $38.99. Sometimes they will run a sale of $5 off…so $33.99 a box. But each box contains a different amount of diapers depending on the size. Here’s the breakdown….

Kirkland diapers
Size 1-2: 136 diapers
Size 3: 210 diapers
Size 4: 180 diapers
Size 5: 162 diapers
Size 6: 135 diapers

This means each size diaper costs a different amount. So, I was curious how much on average I pay for each diaper regardless of size. This way I could compare Costco’s price to the national average cost of 26 cents a diaper. (This is the number I found off of Google.)

Breakdown
Size 1-2: $38.99/ 136 diapers = 0.287 per diaper
Size 3: $38.99/ 210 diapers = 0.186 per diaper
Size 4: $38.99/ 180 diapers = 0.217 per diaper
Size 5: $38.99/ 162 diapers = 0.241 per diaper
Size 6: $38.99/ 153 diapers = 0.289 per diaper

If you average all the sizes together you get 0.244. So Kirkland is 24 cents a diaper vs the national average of 26 per diaper. Yep. Costco rocks!

Upcycled business cards

Standard
Upcycled business cards

When I first started my etsy shop a couple years ago I was looking for a cheap way to make business cards. I decided to use free materials I had around the house: cardboard. I make a quick template of a business card shape I wanted and started cutting. Next I used an ink pad and stamps to write my shops name on the cards. They turned out great! So, not only were the business cards free, but they were made from recycled materials. Double yes!

Shameless plug.
If you don’t have time to cut out your own business cards, then check out my etsy shop:
theredmill.etsy.com

20140312-162116.jpg

20140312-162120.jpg

20140312-162125.jpg

20140312-162130.jpg

Shepherd’s Pie Recipe

Standard
Shepherd’s Pie Recipe

In inspiration of… one) the rainy London-type weather and…two) upcoming St. Patrick’s day, I decided to make shepherd’s pie last night. I don’t understand why more Americans won’t make this dish a staple in their house. It’s delicious and easy. If you can brown meat and make mashed potatoes, then you can make this meal. It was an instant hit in our house (as usual).

By the way, interesting fact….Americans often use beef in this recipe so it’s really called “cottage pie” in this instance. Europeans often use lamb, which is the true way of making shepherd’s pie.

This is also a good recipe to use up some leftover mashed potatoes if need be…

Here’s the modified recipe I used based off a recipe online I found at http://www.simplyrecipes.com/recipes/easy_shepherds_pie/.

Shepherd’s Pie
ingredients
1 1/2 lbs ground beef
1 onion, chopped
1-2 c. Vegetables—chopped carrots, peas, corn
1 stick butter (that’s a lot…you can scale it back if you want)
1 c. Milk
1-2 tsp. thyme
1 tbsp. Worcestershire
Salt and pepper to taste

steps
1. Peel, quarter and boil potatoes until soft.
2. Sauté onions with 1/2 stick butter. Add meat and brown. Add rest of vegetables until soft.
3. Add spices and 1/2 c. milk.
4. Mash potatoes with 1/2 stick butter and 1/2 c. milk. (I like to use my kitchen aid mixer. Makes my life so much easier.)
5. Place meat in baking dish and top with mashed potatoes and cheddar cheese. Bake 400 degrees for 30 minutes.

Enjoy!

20140307-114935.jpg

20140307-114939.jpg

More on Lacking Green Thumb

Standard
More on Lacking Green Thumb

Like I said. You don’t lack a green thumb. You just lack the right plants. And that’s where I come in to help.

On my last post about gardening, I talked about how bulbs are so easy. Now I want to talk about blueberry bushes. We live in the south. This might not apply to everyone. But we have found blueberry bushes to be so easy! They make a great landscaping bush and they give us delicious berries in the summer. Plus, the leaves turn a rich red color in the fall. I think the leaves are more beautiful than some of the trees!!!


Watering:


I usually don’t water my bushes unless we are in brought conditions and even then I only water maybe once a week.

Fertilizing & Pests:

I don’t spray my blueberries. I have found that they usually do fine without spraying for pests. I do usually feed them once a year. I like to buy fertilizer stakes from Home Depot. You just stick them in the ground by the base and done. Your bush will be slowly fertilized all season. Another great way to fertilize your bush is to spread rabbit droppings around the base. BUT only rabbit droppings! If you try using any other kind of droppings, you will burn your plants if you don’t let the droppings sit for a year and mature. Chicken, cow, horse, human, etc. All of these need to sit for a year before use.

Pruning:

I don’t usually prune my blueberry bushes. You can trim and shape them a little if need be, but I would only trim them in last fall. You can trim them in the spring, but you lose some of the buds that have already formed. Again, I usually don’t trim unless a branch started growing in my walkway area. So, more shaping than anything.

When to plant:

You can find blueberry bushes at most gardening stores. It’s recommend to plant new bushes in the fall or spring.

IMG_2315

Hope this encourages you to go out and start gardening. Growing your own food and flowers can be so much fun. It really doesn’t take a lot of work to enjoy a nice harvest 🙂

Lacking Green Thumb

Standard
Lacking Green Thumb

Do you lack a green thumb? Does gardening intimate you?? Well, it shouldn’t! If you have a hard time gardening, then maybe you need to find the right plants for you. Now that spring time is in the air, I’m going to start posting about my favorite fool-proof gardening plants that I have had great success with. I don’t water these plants. I don’t usually trim these plants. I don’t spray these plants. I basically just leave them alone and they love it!!!

One such plant is the daffodil. To me, it’s not spring until I see the first daffodil flower opening. They are so bright and happy. They bring a smile to my face. I love a fresh bouquet of daffodils on my kitchen counter. I got a couple of bags of daffodil bulbs when we first moved into our home about 5 years ago and they are still going strong. In fact, I think my daffodils have multiplied through no effort of my own.

Go plant your own bulbs! Almost any gardening section should have bulbs right now. I have even seen a huge bag at Costco. Go buy a bag next time you are out and about. Plant the bulbs in a favorite flower bed. Dig a hole, insert bulb, and cover with dirt. It’s that easy. Just read the directions on the back of the bag to figure out how deep to dig. Each kind of bulb requires a different depth. Also, check to see what kind of sun light the bulb likes. My daffodils are in a mostly sunny location.

Irises, daffodils, tulips, etc….They are all very easy plants. I have had great luck with daffodils. And when they are done, the irises pop up next. Beautiful tall purple flowers. I have tried tulips. They are pretty, but the rabbits in my neighborhood think they are tasty. I don’t think I have any tulips left. Guess I’ll see if any pop up this spring….


IMG_6885  IMG_6884

IMG_6886

Berry Good Muffins

Standard
Berry Good Muffins

These muffins were an instant hit. I asked my husband to critique them, but he couldn’t think of anything I should change. They were that good.  And my husband knows baked goods. He used to work in a bakery. I give the muffins maybe another day before they are all gone. Guess I’ll have to double the recipe and make more next time. Yum!

I got the recipe from ajoyfulchaos.blogspot.com. You should check out her blog. It’s very down to earth and refreshing. Here’s her recipe….. Much better than the store bought and cheaper too!

IMG_6883 IMG_6882 IMG_6881

Blueberry Crumb Cupcakes

½ cup butter (softened)
1 cup sugar
2 eggs
1 Tbsp vanilla
2 Cups flour
2 tsp. baking powder
pinch of salt
1/3 cup milk
1/3 cup water
1½ cup blueberries

****I used a mixture of blueberries, blackberries and raspberries. I bought a huge bag of mixed berries from Costco. That way I can have delicious berries even when they aren’t in season.

Topping

1/3 cup flour
¼ cup butter (softened)
½ cup sugar
1 tsp cinnamon

In a large bowl combine butter and sugar. Add eggs and vanilla. In a separate bowl combine flour, baking powder, and salt. Add half of flour mixture to butter mixture. Mix. Add milk and water and mix well. Add remaining flour mixture. After mixing spoon into cupcake liners. Sprinkle blueberries on top.

In a bowl mix topping ingredients until crumbs are uniform and spread over berries. Bake at 350º for twenty minutes.

Yield 20 delicious moist cupcakes with a delightful sugary crunchy top.

Buying in Bulk

Standard
Buying in Bulk

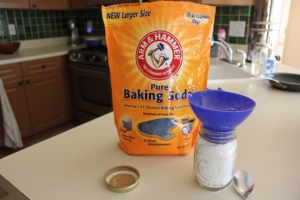
I know buying in bulk can be intimating. It’s not really that bad though. And it can say you a lot of money. Sugar, Beans, Baking soda, Flour……. I like buying bulk items from Costco. There are lots of places you can buy bulk supplies, especially baking supplies.

Store bulk items….

Option One: Some people leave the bulk items in the original containers. I have heard of people putting bay leaves in the original containers to help keep out bugs. But what about moisture?

Option Two: I have heard of  people storing sugar and flour in 5 gallon food-grade buckets. Good idea. But I don’t have any buckets. And I don’t feel like going out and buying some.

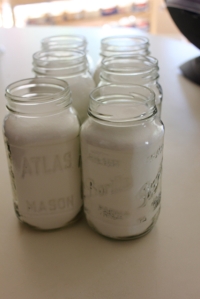
Option Three: Storing the flour and sugar in smaller containers. I have 3 beautiful wooden canisters on my kitchen counter. I got them as a wedding gift. But I can’t fit everything in these canisters. So, I store the rest in glass jars. It makes it easier to refill my counter canisters. Plus, the jars a lot lighter and easier to lift than a 5 gallon bucket. (I don’t have any 5 gallon food-grade containers. Jars are free!)

IMG_6880

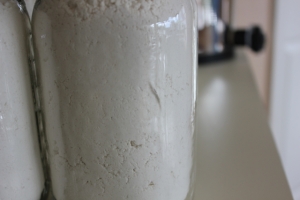
Side note…Not all mason jars are canning friendly. For example, the Classico sauce jars are mason jars. But they don’t always work with the canning lids. Some do. Some don’t. It’s a real pain when you suddenly find the lids won’t work in the middle of canning. I have toasted too many fingers this way. So I am picky with my canning jars. I try to use Classico jars for my bulk storage instead. If I have a canning jar with a crack, I also use it for storage. If I tried to use a cracked jar for canning, I would risk it breaking from the temperature changes. It’s not fun digging pieces of glass out of the pressure cooker. (See the hair line crack in this jar?)

IMG_6879

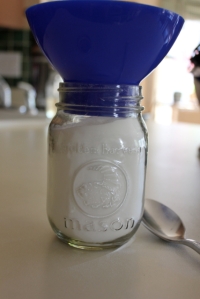
Filling…. I like using a flannel to fill each jar. Next I have to go find a lid that fits. I don’t like storing the lids of the jars just in case they get stuck.

IMG_6864 IMG_6866IMG_6878


Save those lids… I know that you can’t reuse canning lids a second time for canning. You risk not getting a proper seal. But you can reuse the canning lids for storage. Just relabel the lid with a new label from tape. Reuse. Reduce. Recycle!

IMG_6875IMG_6874IMG_6877

Conversions….

10 pounds of sugar = 7 quarts of sugar

IMG_6867

25 pounds of flour = 23 quarts of flour

IMG_6872


Finished product….

IMG_6871 IMG_6870 IMG_6869

Pancakes

Standard

Pancakes…..

It’s so easy to throw a few waffles in the toaster in the morning for breakfast. Fast, simple. Nice. I usually buy my waffles at Costco because it seems likes a pretty good deal. But what if I made my own waffles instead?

IMG_6850 IMG_6849 IMG_6848


I’m going to work out the calculations in a future post. But in the mean time….

I do not have a waffle maker. But I can make pancakes. So, I surprised my kiddo with homemade pancakes instead this morning. I haven’t made pancakes in a long time. My dad actually taught me to make pancakes as a kid. It’s one of the few things he cooked and I enjoyed sharing this experience with him.

IMG_6857 IMG_6853 IMG_6852


As a side note, if you ever see a vintage Pyrex mixing bowl at a yard sale then get it. They are amazing. I have several. This happy yellow bowl is my favorite. They really come in handy for skinning tomatoes and peaches while canning.

IMG_6855


I knew that my little one and I couldn’t finish all the pancakes from this recipe. So, I decide to eat what I could and freeze the rest for later. I was afraid the pancakes would stick together. To solve this, I froze each pancake individually on a baking sheet. Once frozen, I stacked the pancakes together and placed in a freezer bag. Labeled. Done!

IMG_6858

I don’t really enjoy syrup. Weird. I know. I like using homemade jam instead. This picture shows my homemade blackberry jam from last summer. Yum!!!

IMG_6863